Borderlands 3 Maliwan Takedown: How to complete the raid
In our guide to Borderlands 3 you will learn:
- How to defeat the Valkyrie Squad with ease
- With which build you can solo Maliwan Takedown
- Which rewards you can get
- How to defeat the final boss Wotan
The Maliwan Takedown raid has been playable for some time. However, it still poses a great challenge to the community. Especially if you are going to solo the raid, you need the right build. In this guide, you will find the basic knowledge you need to master the raid without any problems.
For more useful tips on the game, check out our ultimate Borderlands 3 guide. If you're interested in the upcoming DLC, it's worth taking a look at our guide to Moxxi's Heist of The Handsome Jackpot.
What is Maliwan Takedown?
Maliwan Takedown is a raid specifically designed for 4-player groups. It's about taking out a Maliwan secret base, where various special units are waiting for you, making the mission quite difficult. Among other things, the special units can disguise themselves and thus become almost invisible to you. Another special unit carries a shield that reflects elemental damage back at you.
The duration of a run as a group is 30 to 45 minutes. During this time you will encounter some special units as well as some mini-bosses. Halfway through and at the end of the raid, you'll also encounter two very tough boss fights.
About halfway through Maliwan Takedown, you'll encounter the Valkyrie Squad, a trio of Valkyries. At the end of the raid, Wotan awaits you, who has various abilities and combat phases that make the fight very difficult.
How to get to the raid
Maliwan Takedown was released with the Halloween content update, but will be playable beyond the event. The raid does not need to be unlocked and is accessible for free. To enter it, you must have completed the main story.
The quest giver for Maliwan Takedown is located in front of the stairs in a corner.
Once you have completed the prerequisite, head to Sanctuary III and walk down the hallway that leads past Marcus. At the end of the corridor, just before the stairs, you will find a crate on the right. You will receive the quest "Discovery: Elimination in the Maliwan Secret Facility", which will take you to the area once you accept it.
These rewards await you in the raid
With Maliwan Takedown, developer Gearbox has also brought some new items to the game. You can get these either in the raid or from older bosses. In addition to a Chamber Hunter skin, an Echo skin and a room decoration, there are other items that support you in battle. Which items are still available, how you can get them and which special features exist, you can find out in the following table.
| Name | Brand | Type | Location | Requirement | Effect |
| Zheitsev's Eruption | Children of the Vault | Assault Rifle | Valkyrie Squad, Wotan or Raging Titan (The Slaughter Shaft) | Difficulty: Mayham 4 | Fires homing projectiles while overheating. |
| Good Juju | Dahl | Assault Rifle | Valkyrie Squad, Wotan or Rampager | Difficulty: Mayham 4 | Reloads the magazine immediately after a kill. |
| Crader's EM-P5 | Dahl | SMG | Valkyrie Squad, Wotan or Pain & Terror | Difficulty: Mayham 4 | Increases movement speed and precision in the air. |
| Tankman's Shield | Hyperion | Sniper Rifle | Valkyrie Squad | Difficulty: Mayham 4 | After a kill, the following magazine receives bonus damage. |
| Vosk's Deathgrip | Maliwan | Shotgun | Valkyrie Squad, Wotan or Troy Calypso | Difficulty: Mayham 4 | Creates either a singularity or a laser trap. |
| S3RV-8OS-EXECUTE | Tediore | Pistol | Valkyrie Squad, Wotan or General Traunt | Difficulty level: Mayham 4 | If you reload when the magazine is completely empty, the following magazine will receive bonus damage. |
| Juliet's Dazzle | Torgue | Assault Rifle | Valkyrie Squad, Wotan or Aurelia Hammerlock | Difficulty: Mayham 4 | Reloads the magazine immediately after a kill. |
| Spiritual Driver | - | Class mod: Amara | Wotan or Sylestro (Crew Challenge on in the Tazandeer Ruins) | Difficulty: Mayham 4 | Amara's Action Skill element transfers to her once she activates her Action Skill. |
| R4kk P4kk | - | Class mod: FL4K | Wotan (Tink of Cunning - Ghostlight Beacon) | Difficulty: Mayham 4 | As soon as FL4K's Rakk attacks an enemy, it splits into two more Rakks for additional damage. |
| Raging Bear | - | Class mod: Moze | Wotan or Billy the Anointed | Difficulty level: Mayham 4 | Reduces fuel consumption and significantly increases the Iron Bear's damage. |
| Antifreeze | - | Class mod: Zane | Wotan or Arbelest of Discipline in the test area | Difficulty level: Mayham 4 | Increases Zane's weapon damage and damage reduction while he is in the air or sliding across the ground. It also increases his movement speed once he slows down. |
| Frozen Snowshoe | Anshin | Shield | Wotan or Valkryie Squad | - | Still unknown. |
| Version 0.m | Anshin | Shield | Wotan or Valkryie Squad | - | Returns the AMP shot when the shield is charged. When the shield is depleted, a red circle appears, increasing the weapon damage when the player is inside it. |
| Re-Charger | Hyperion | Shield | Valkryie Squad | - | Removes reload lag when shield is depleted. 20 second cooldown. |
| Red Card | Anshin | Shield | Valkryie Squad | - | Uses up your entire shield when you slide into enemies and deals bonus damage. The higher your shield, the higher the damage dealt. |
A different respawn rule applies in the new Borderlands 3 raid
The most difficult challenge concerns respawning. If you die, you'll enter spectator mode and lose any possibility to actively participate in the battle. If your squad packs Valkyrie Squad, you'll be resurrected in time for the loot giveaway. If you die after the first boss, you'll also be resurrected in time for the loot distribution after your comrades have defeated Wotan.
This makes it all the more important to use the "fight for your life" mode and get revived by allies during this time. You should also consider using the old familiar tactic of leaving a weaker opponent alive so that someone can get to "New Strength" when they are down.
Maliwan Takedown can also be completed solo
To successfully complete the first Borderlands 3 raid solo, you'll need special weapons and skills with each character. In any case, note that the raid is designed for 4 players and you really need to master your character, otherwise you won't stand a chance.
Zane's solo build for the Maliwan Takedown
- Weapon#1: Protuberance, Host or other blue and purple eridian shotguns
- Weapon#2: Face-Punsher
- Weapon #3 Lyuda or Cutsman (With Corrosion Effect)
- Weapon #4: Any
- Class Mod: Executor
- Artifact: Victory Rush, Splatter Gun or Otto Idol
- Shield mod: The Transformer
- Grenade Mod: It's Piss, Recurring Cryo, Hex or Tran-fusion
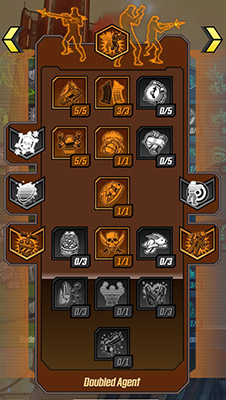
Zane needs skills from all three talent trees to stand any chance in the raid. With this build, Zane is extremely fast and can dodge to a great extent. The action skills "Barrier" and "Digi-Clone" ensure longer survival and are especially important for boss fights.
The best weapons for this build are partially dependent on your play style. Protuberance deals high single damage, while Host deals high elemental damage over time and requires a more precise playstyle. Using Face-Punsher recharges your shotgun ammo. Protuberance and Host benefit from the combination, as both shotguns require a lot of ammo.
Opt for Lyuda or Cutsman for the third weapon slot, as both weapons deal solid damage and are easy to handle. Executor as a class mod gives you another kill skill activated by your Seein' Red talent. Victory Rush is chosen for more damage as an artifact.
Splatter Gun is much rarer, but should be used if you already have it. Otto Idol is suitable for lovers of a defensive playstyle. The Transformer is extremely strong due to its shock immunity and is therefore the first choice as a shield mod.
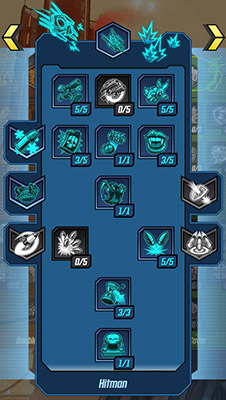
Solo build for Moze
- Weapon#1: Devoted (With burn and cryo effect or burn and corrosion effect)
- Weapon#2: Trevonator (With burn and cryo effect)
- Weapon#3: Cutsman
- Weapon#4: Sellout (With corrosion effect if Devoted has none)
- Class Mod: Bloodletter
- Artifact: Deathless, Otto Idol or Victory Rush
- Shield mod: The Transformer
- Grenade mod: Quasar or Storm Front
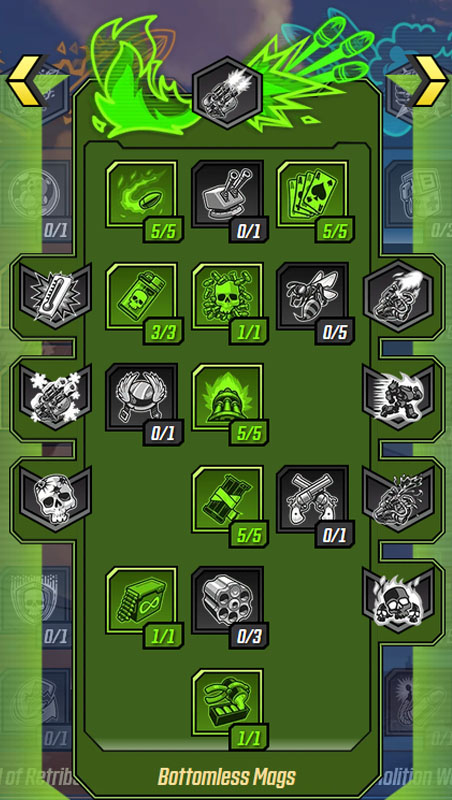
Moze's solo build is a modification of the standard build and takes into account the latest nerf. With this build, you play Moze at medium range to your opponents. With increased magazine capacity and the high ammo regeneration, there are no reload times. This maximizes your elemental firepower.
While you don't need to pay attention to anything special when using Trevonator and Cutsman, Devoted requires a unique playstyle. Devoted's rate of fire increases the longer it is fired. If you stop firing, you lose the high rate of fire and start over.
The elemental combination allows you to use the weapon mode switch to weaken heavily armored enemies and then finish them off with fire damage. The weapon mode change doesn't interrupt the weapon, so it doesn't slow down the rate of fire.
Trevonator freezes your enemies and keeps them away from you. Cutsman serves as a backup weapon, while Sellout is used in boss fights. Bloodletter is the main cornerstone of this build, along with Devoted. The class mod provides continuous shield regeneration and keeps you alive.
Deathless is the best artifact you can use. Since it is very rare, Otto Idol or Victory Rush serve as a second choice. The Transformer is the shield mod par excellence, as it grants immunity to shock damage. As a grenade mod, we recommend Quasar or Storm Front, as these grant enemy control and thus additionally secure your survival.
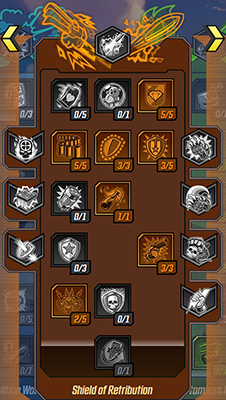
With this build, FL4K can single-handedly complete the raid
- Weapon#1: Maggie (with cryo effect)
- Weapon#2: Brainstormer (With cryo effect)
- Weapon#3: Cutsman (With Corrosion Effect)
- Weapon#4: Any
- Class Mod: Tallying Ranger Cosmic Stalker
- Artifact: Otto Idol (Icebreaker)
- Shield Mod: The Transformer
- Grenade Mod: Any MIRV Grenade (With Cryo Effect)
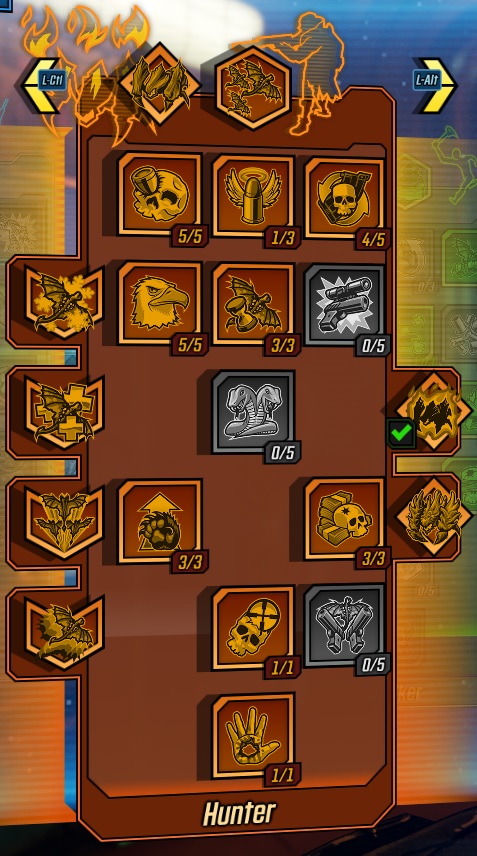
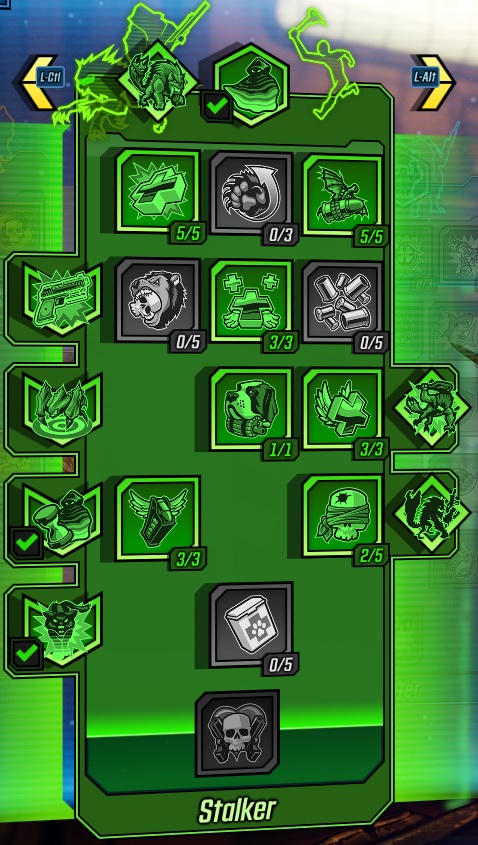
In this solo FL4K build, we rely on critical hits and the Disappear action skill. The Forge Spiderant provides much needed extra health. A big advantage of this build, compared to the other solo builds, is the resurrection from FL4K's pets.
The cryo effects of the weapons are especially important, as you can control masses of enemies more easily, ensuring your survival. Maggie is especially useful through the hail of bullets, as she fires six bullets but only uses up one ammo. Brainstormer provides high control of enemy masses with the cryo effect and the chain lightning weapon effect.
Cutsman is an all-rounder weapon that is great for boss fights due to the corrosion effect. The class mod provides more damage, increases reload speed, and boosts some of the Beastmaster's skills. If you use the Icebreaker Otto Idol, you get extra damage against enemies affected by the Cryo effect.
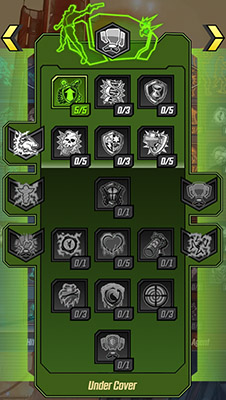
For Amara this solo build is suitable
- Weapon#1: Cutsman (Binary Mocking)
- Weapon#2: Shotgun (Shock and Cryo Effect)
- Weapon#3: Any weapon with recursion effect
- Weapon#4: Any weapon with corrosion effect
- Class Mod: Phasezerker
- Artifact: Any, our recommendation: Otto Idol
- Shield mod: The Transformer
- Grenade mod: Any, our recommendation: Fastball or Tran-fusion

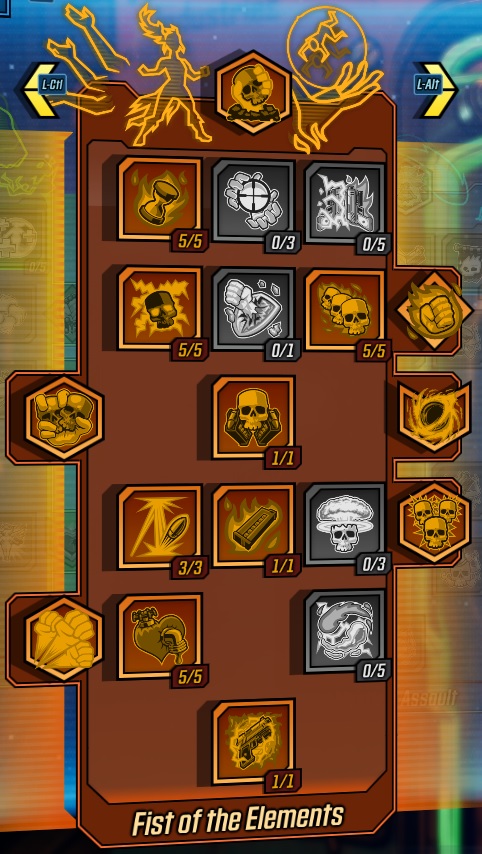
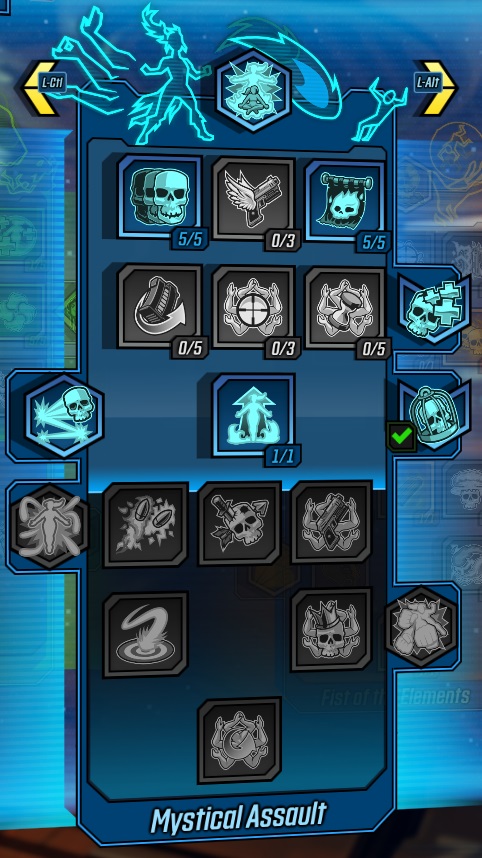
Amara's solo build is based on the use of Elemental Fist and is an adaptation of the Phase Embrace build. Through this skill, Amara deals tons of elemental damage while regenerating her life. Skills like Intimacy turn Amara into a melee fighter, as damage from close range is significantly increased.
The Cutsman in the Binary Mocking variant deals enormous damage to anointed and bosses as soon as the action skill ends. In addition, you need a shotgun to finish off shields as quickly as possible. At best, it has a second mode with cryo effect.
If you don't have a shotgun that combines these two elements, use your fourth weapon slot for a cryo weapon. The popular Transformer shield is also used here.
Maliwan Takedown: How to defeat the Valkyrie Squad
After defeating Kraken for the first time, enter the entrance and defeat the enemies on the way to the vending machine. Fill up your magazines here and get ready to fight the Valkyrie Squad. Three different Valkyries await you.
In this fight, be sure to note that you will fall off the platform and die if you step over the edges. You'll have to watch your step throughout the fight, keep an eye on the trio and dodge their attacks. This is the biggest challenge in the fight against the Valkyrie Squad.
You'll have to dodge the attacks in any case, since they cause a lot of damage when they hit you. However, since the projectiles are relatively slow, this shouldn't be a problem. It is especially effective if you focus on a Valkyrie and continuously shoot at it.
Destroy the Valkyrie's shield to initiate an immunity phase . Here, all three Valkyries move into the air and become immune to any damage. During the air phase, several enemies appear that have little life. Kill them, otherwise they will overrun you after a short time and you won't be able to withstand the damage.
At regular intervals, the Valkyries will come down one by one . Then target them again until they become immune again and climb up. Repeat this until you have defeated all three Valkyries.
Wotan Boss Guide: The first stages of the fight against Wotan
The fight against Wotan takes place in four stages. He greets you while hiding behind a massive yellow shield. Use shock damage to destroy Wotan's shields as quickly as possible. We explain the elemental effects in detail in our ultimate Borderlands 3 beginner's guide.
Focus on the gaps in the shield on the sides and shoot through them to deal damage. Avoid using grenades, as they are ineffective. The gaps are big enough to hit from far away. Once the shield is destroyed, you'll see a small glowing box on Wotan's back. It is his weak point, and its hits cause massive damage.
Throughout the fight, you can expect attacks where Wotan releases several missiles and laser shots aimed at your position. Check the impact marks on the ground and stay away from them to avoid the missiles.
Wotan's laser shots are much faster. Run away from them and use the pillars in the room as hiding places. In the second phase, his shield returns in vertical form. At the same time, he summons many Valkyries, which you need to take care of first.
Halvethe number of Valkyries, as you will be easy prey for the large number of enemies. After that, use the gaps in the shield to deal damage. The shield rotates continuously, so try to aim as best as possible. After its destruction, Wotan will jump wildly around the arena and initiate phase three.
How to defeat Wotan in the first Borderlands 3 raid for good
In this phase, Wotan is protected by an inner and outer shield. You'll have to destroy both of them to move the fight to the next phase. The outer shield can be passed by you without taking any damage. From the area, you can attack the inner wall of the outer shield.
Once his outer shield is destroyed, Wotan summons the NPCs Thor and Kraken. Use your corrosion weapon to finish them off as quickly as possible. Then destroy the inner shield, noting that the vertical gaps are very small. However, there is no shield above his head.
You'll do the most damage by jumping from the pillars and aiming at the unprotected area above his head. After a few jumps, you'll reach the final fourth stage, where Wotan splits in two. To master the raid, you'll have to destroy both parts.
Wotan's lower body moves faster and is harder to hit, while his upper body is extremely dangerous. He flies up into the air and shoots around with a fire laser that does massive damage. Destroy the upper body first.
Then turn your attention to the lower body, which will confront you with the last shield of the fight. Due to Wotan's increased movement speed, it's harder to determine his position this time. Nevertheless, try to keep an overview of the fight at all times so that you can avoid his missiles more easily.
Similar to the fight against Troy Calypso in Borderlands 3, Wotan's lower body shoots energy balls around himself in a semicircle , slowly moving towards you. Dodge them by positioning yourself between two projectiles.
More interesting guides for Borderlands 3
- Borderlands 3 Trophies: All achievements in the guide
- Legendary Weapons: These weapons are known in Borderlands 3 so far
- Borderlands 3 Shift Codes: Get the golden chest keys
- Get VIP Points: These email codes are currently valid in Borderlands 3
- Borderlands 3 mods: the best mods 2019 & how to install them
Visit us on Facebook and Instagram to discuss your favorite games.